The goal of this project was to create the start of a comprehensive tool specifically for analysing circles of rot left in the ground by the bent pole constructions methods that the Eastern tribes of American Indians used pre and post-white man. We chose to write it as an extension to ArcMap since this is a widley used and accepted product used by archaeologists. Current functionality allows an archaeologist to take polygons representing post holes and calculate their centroids. Those centroids can then be run through a filter that generates lines connecting all centroids that are a user specified distance apart. This is an implementation of Sue Pressano's algorithm for finding structures in a plot crowded by many post holes.
This is all done as an extension to ArcMap written in Visual Basic .NET. None of developers had any prior experience with VB.NET, COM classes, or Windows programming in general. The development was further complicated by the lack of adequate documentation available for the ArcGIS suite (ArcMap included) provided by ArcGIS' publishers, ESRI. So we mostly learned from example using ESRI's extensive Developer's Kit. The kit itself contains many examples of Visual Basic 6.0 code written to interface with the ArcGIS suite. Unfortunately, code examples are no substitute for method by method API documentation. Writing this extension involved a lot of blindly running ESRI's methods and hoping they work the way we thought they did. We eventually got everything to work, but there is always still the chance that some odd undocumented error case will fly up out of nowhere to hamstring the extension. For this reason we decided to keep out interactions with ArcGIS to a bare minimum.
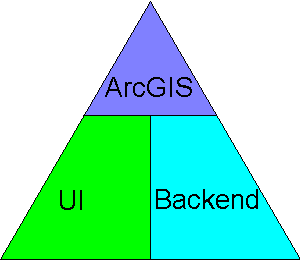
Moving on to architecture, since the current functionality is far from comprehensive, the code was designed to be extensible. It is split into two logical partitions: the user interface and the algorithms. The user interface is basically the tool bar that appears in ArcMap while the algorithms are the chunks of code that actually do the dirty work such as generate centroids or find linkages.
Both the user interface and the algorithms have to interface into ArcMap through its unwieldy API, so we decided that they should at least interface with each other cleanly. Each partition has a "gateway" that interfaces with the other partition. These gateways allow one partition to interface with another without directly accessing any of the inner workings of the other partition. For example, when the user clicks on the button to start the centroid calculation, the button uses its onClick event to call a routine in the Algorithm section's gateway called the Launcher to start centroid calculations. The button does not have to know what module holds the centroid calculation code, nor does the centroid calculation code have to know what button might call it. We made this design decision because it both modularizes the code and abstracts the algorithms and their behavior from the ArcGIS API and greatly reduces the work required by the algorithm writers.
Below there is a table for the Class and Module definitions. For those not familiar with Visual Basic, Classes are just like classes from Java or C++ and Modules are like static classes. Thus they are differentiated below. Here is the key: Classes, Modules, Section delineations.
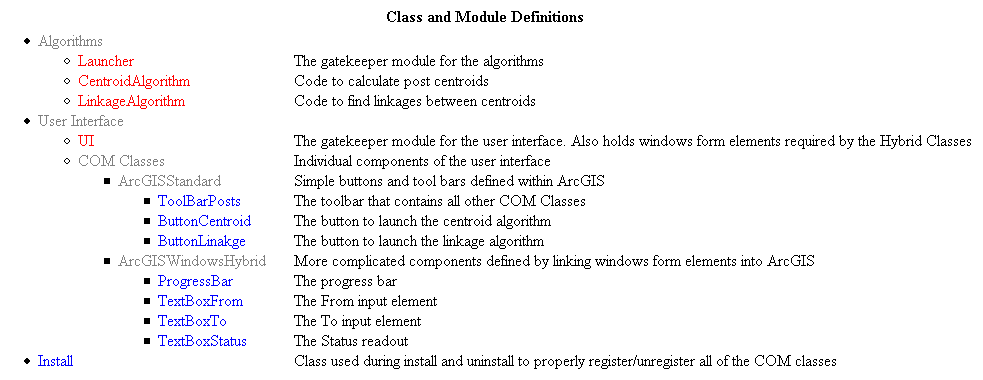
Below this there is an image to show how the above link together. The links are color coded below the image.
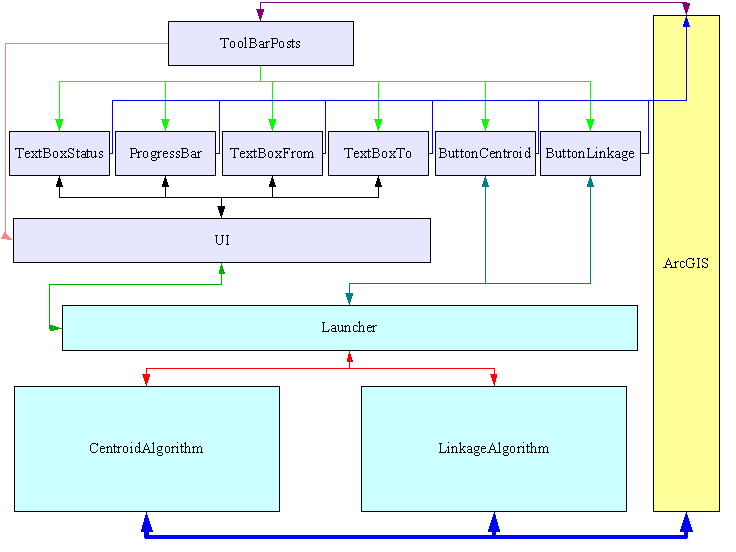
The Launcher modules serves as the gatekeeper for the algorithms. All calls to start an algorithm should originate from here. Also, all calls from an algorithm to update the user interface should pass through a function in the launcher.
The Centroid Algorithm, once called, takes the layer that is passed to it and calculates the centroids, outputting them to a new layer. Because it takes so long to access ArcGIS and query the centroids, the algorithm also does a bucket sort on the centroids based on their already queried coordinate attributes. This is not done in ArcGIS and, therefore, is relatively fast compared to the total time of the algorithm. It then outputs the buckets to a temporary file which can be read by its counterpart, the Linkage Algorithm. We decided to use this temporary 'buckets' file because is greatly speeds up the Linkage Algorithm. This is important because the Linkage Algorithm is designed to be run multiple times and it was decided to place all of the time limiting bottlenecks into the seldom run Centroid Algorithm. The temporary file is a simple text file with a format describe in the Linkage Algorithm code - the format was kept simple for somewhat readability but more importantly because Visual Basic file reading is very basic. The Object ID's are preserved in this temp file because this allows for the code to access the original polygon through ArcGIS that the centroid was generated from as well as for future extensionality. One such proposed extensionality is to make an ArcGIS API call to select all 'features' that correlate to the Object ID's that were linked so that the user does not have to do this manually.
Once the Linkage algorithm is called by the launcher, it reads the selected point layer as well as a temporary file that is the product of the Centroid Algorithm. This temporary file greatly reduces the run-time of the algorithm since less interaction occurs with the ArcGIS platform itself. Once the buckets are read from the temporary file, the algorithm loops through all buckets and checks for points within the input range passed in from the launcher. The Linkage Algorithm itself is very fast, however, the total run-time of this algorithm depends on the number of linkages made as ArcGIS API calls. Since the centroids have already been created, the Linkage Algorithm can be run any number of times once the centroids have been calculated. The Linkage Algorithm will output a new shapefile layer that consists of polylines representing the linkages between post holes. As a sidenote, polylines were necessary to used since ArcGIS does not allow line type layers. For the final optimization, we chose to spatially partition the map into 'buckets' so that the Linkage Algorithm would run more efficiently - we call this 'bucketing'. The clients gave us a maximum range for linkages so we constructed an algorithm and datastructure that efficiently calculates the linkages very quickly by only checking its nearest neighbor bucket. We made a custom data structure for this algorithm since Visual Basic's primitive types are limited and didn't provide the flexibility needed. For more detailed information, refer to the Linkage Algorithm code.
The user interface consists of simply two input boxes, 2 labeled buttons, a status section, and a progress bar. We decided to keep the user interface extremely simple since the users have very basic and repetitive needs for this solution. This forgoes batching or queueing of commands for a more clean and intuitive interface. The input boxes and labeled buttons provide for the basic functionality of the toolbar and are necessary for it to work. The status section and progress bar are not necessary per se but yield very helpful feedback to the user as to what the toolbar is currenlty doing and the relative time left on a command. This information was deemed important for usability so these elements were included in the interface for the sake of the user.
Beyond the gatekeeper, the entire user interface is made up of classes. Each class represents a single element in the user interface like the "From" textbox or the button to launch the Centroid Algorithm. The interesting thing about this is that our extension instantiates none of these classes. The user interface code within ArcMap instantiates the classes and hooks them onto the user interface. First it instantiates the toolbar (ToolBarPosts in our case), and then instantiates all of the components within the toolbar.
The advantage of this is that we do not have to be concerned with the implementation of windows tool bar that float or can be docked and whatnot. We simply have to deal with very compartmentalized interface elements. The disadvantage of this is that none of the classes themselves can be accessed by the modules. The buttons have no problem accessing the modules, but the other way doesn't work. Our solution to this is to keep all of the windows form items that the hybrid classes use in the UI module itself and let the classes reference back to it. This solution is perfect for our purposes because the only non-onclick data that comes from or goes into the user interface is stored in the windows form items and thus easily accessible.